This is part two of Control Rapiro with Mobile Phone tutorial. For information how to connect RedBearLab BLE Nano and Rapiro, you can find in Part one of the tutorial.
https://www.youtube.com/watch?v=_6RAtwv2kAY
High Level View
From the high level view, the mobile phone will send command to BLE nano through bluetooth connection (UART). Then nano will interpret the command and translate to Rapiro‘s serial command, and send to Rapiro through Serial connection.
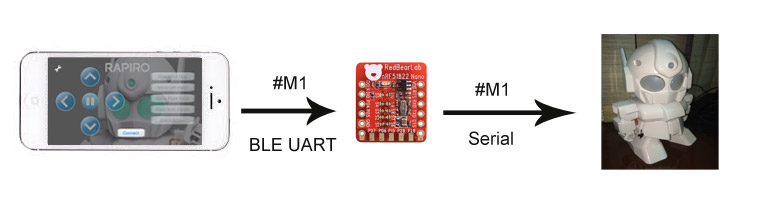
For simplicity, Rapiro will be loaded with standard firmware that comes with it. (You can find Rapiro standard serial command here: http://wiki.rapiro.com/page/serial-command/) The mobile phone will send a command to BLE Nano, and BLE Nano will forward the command to Rapiro through Serial connection like the picture above.
The Arduino Program
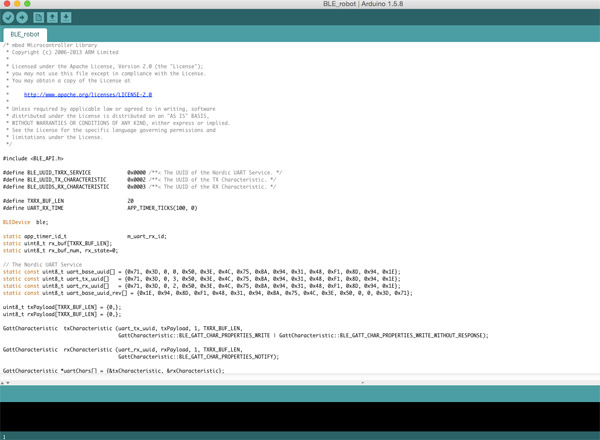
First, please download the program here. Or you can find the program under Arduino IDE (File->Example->BLE_API->nRF51822-Serial) if you have installed the latest RedBearLab Addon for Arduino. Note: Please change the Serial Baud Rate to 57600 or Rapiro Standard firmware speed to 9600 (recommended) to match the baud rate.
This is the BLE Nano firmware for forwarding string commands from BLE UART to Serial. I would not explain the program line by line, but will go through some details later on.
Save the folder in your Arduino directory. Open the program in Arduino IDE. Upload the program to BLE Nano through MK20 USB Board.

After you have uploaded the program to BLE Nano, you can connect it back to Rapiro. (Part 1 Hardware connection)
Your Rapiro will be able to listen and react to Serial command from BLE Nano by now.
How it works:
UUID:
BLE uses UUID to identify each service and characteristics. In line 43-59, we declared the BLE device as a UART service. UART services has two characteristics, receive data and transmit data, so we will need three different UUIDs. (our mobile app will look for this UUID for service and characteristics)
Line 43-59:
ble.onDataWritten()
ble.onDataWritten() is a event listener function that will be attached in the setup function.. (line 121) This event will be called whenever there is data written through UART service (from other BLE device)
Handling data written event
The event handler function will forward data from UART service to Serial. This is the core of the program for forwarding command to Rapiro.
Line 92-105
Customise your Arduino Program
You can change UUIDs for your own need. You may also change onDataWritten() event handler function for interpreting your own command sets. Don’t change the rest of the program unless you know what you are doing. I won’t explain much because it will be way beyond the purpose of this tutorial.
The Mobile App (IOS)
I have created an IOS app for this tutorial. If you are an IOS developer, you can get my program at Github (https://github.com/sunnycyk/Rapiro) and run it on your own device with XCode.
However, if you are not a registered IOS developer, you will not be able to run it on your physical IOS device. The app requires BLE to work, and although you can run it on simulator, but there will be no BLE connection. In this care, you may download my App from Apple App store to test it out.
For IOS Developer
The controller program is written in Swift, and each function is self explain by its name.
I will use RedBearLab’s BLE framework for IOS (https://github.com/RedBearLab/iOS) The library encapsulates IOS CoreBluetooth Framework for RedBearLab BLE Board, so you do not have to worry about the connection setting for the IOS app. You can simply add the BLE folder to your App directory.
You may need to change UUID BLEDefines.h for your own UUID settings.
To handle BLE connection, you will have to setup BLEDelegate to handle BLE events, but they are optional:
bleDidConnect()
bleDidConnect() will be called whenever the app is connected to BLE peripheral.
bleDidDisconnect()
This will be called when the connection is lost.
bleDidReceiveData(data, length)
This will be called when a data is sent from BLE peripheral to the App.
bleUpdateRSSI(rssi)
A function that will update the current RSSI (Signal strength)
Send data to BLE periphearl
In order to send data to BLE peripheral, use an instance function write(data).
Conclusion
Now you should understand the basic control of how your IOS device to work with Rapiro + RedBearLab BLE Nano . (for IOS user)
In Part 1, I have shown you how to connect Rapiro and RedBearLab BLE Nano. In this part, I have shown you how can you configure your own firmware for BLE Nano and briefly explained what you have to do in IOS app.
This should be able to get you start for your own hack on RedBearLab BLE Nano and Rapiro. Enjoy!
Comments
3 responses to “Control Rapiro with Mobile Phone Part 2 (IOS)”
[…] Part 2: Using IOS device to control your Rapiro through RedBearLab BLE Nano […]
[…] This is part one of Control Rapiro with Mobile Phone Tutorial. I will show you how to connect Rapiro to RedBearLab BLE Nano Board and use test code to test the connection. If you have successfully connected them, you can go to part two. […]
[…] optional chapter for the tutorial of Control Rapiro with Mobile Device. If you are IOS developer, Control Rapiro with Mobile Device Part 2 is for you. However, since not everyone will pay for IOS development, I also created a simple app […]