This is a quick guide for you to start for controlling Rapiro with RedBearLab BLE Nano and mobile device. If you want to know more technical detail, you can find it here.
https://www.youtube.com/watch?v=_6RAtwv2kAY
Quick Start Step by Step
1. Load Rapiro with Standard Firmware.
2. Upload RedBearLab example Arduino Sketch into BLE Nano with MK20USB. In this sketch, you may need to adjust the Serial baud rate to match Rapiro‘s firmware depends on your setting. (By default, you should change line 113 to Serial.begin(57600) in this sketch)

3. Wire up BLE Nano and Rapiro’s JP5 pins like the picture below.
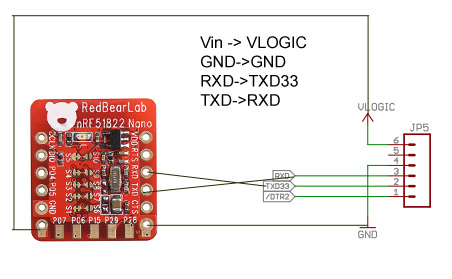
| Rapiro Contoller Board | RedBearLab BLE Nano | |
| Pin 6 Vlogic | -> | VIN (Warning: not VDO pin!) |
| Pin 2 (TX) | -> | D1 (RXD) |
| Pin 3 (RX) | -> | D0 (TXD) |
| Pin 4 (GND) | -> | GND |
4. If you are IOS Developer, you can download my IOS app source and install on your IOS device through Xcode. Right now the UI design is based on iPhone 5, iPhone 5s, and iPhone 6 plus. If you are using iPhone 4, iPhone 6, or iPad, you may want to adjust the layout in the storyboard to fit your need.
5. If you are not IOS Developer or you want to run it other than iOS device, you can download my Cordova app and run it on Evothings Client. For more detail, you can find it here.
If you have any question, please contact me through email: “sunnycyk at yahoo dot com”
or my twitter account: skyc999
Reference Links:
2. RedBearLab BLE Nano & MK20 USB Board
4. RedBearLab BLE Nano UART example code
6. IOS App https://github.com/sunnycyk/Rapiro
7. Cordova Version: https://github.com/sunnycyk/RapiroBLE
UPDATE:
Rapiro Controller is now available at App store now!
![]()
Comments
One response to “Quick Guide Rapiro + RedBearLab BLE Nano”
[…] Quick Guide! […]